My

My
Geje PuwooL

Jumat, 11 November 2011

Cara inject Blackberry CDMA

Default Cara inject Blackberry CDMA

Berikut ini cara inject Blackberry CDMA menggunakan kartu Smart Telecom


Persiapan

1. Kartu perdana SMART , beli di Galeri Smart

2. Waktu beli minta info AKEY (26 digit) sama MIN ( 10 digit tanpa 510009 ya )

3. Download dan Install QPST

4. Blackberry Desktop Manager last version

5. File PRL EVDO Smart Telecom (PRL ID 10009)

6. Dial ##000000 untuk cek CDMA Service Edit Screen

7. Dial *4357# untuk informasi ESN

8. Network Mode pada Blackberry di set 1XEV
Options -> Mobile Network -> Network Mode -> 1XEV


Step by Step

1. Jalankan Blackberry Desktop Manager

2. Konek Blackberry ke PC

3. Pastikan Blackberry terhubung dengan Blackberry Desktop Manager (indikasi ‘Device Connected’ dengan PIN perangkat Blackberry)

4. Pastikan pada device manager terdapat RIM virtual port
control panel -> system -> Hardware -> device manager -> ports (com&LPT) [winxp]
COM port dapat berbeda pada setiap PC

5. Jalankan QPST Configuration

6. Pilih tab Ports

7. Pilih ‘Add New Port’, kemudian pilih port sesuai dengan yg tertera pada
control panel -> system -> Hardware -> device manager -> ports (com&LPT)
[gunakan virtual port terbesar]
Langkah ini (Add New Port) hanya dilakukan pada instalasi pertama, untuk port yang sudah pernah ditambahkan di QPST tidak perlu melakukan langkah ‘Add New Port’ ini.

8. Perangkat yang terhubung akan terdeteksi secara otomatis oleh QPST

9. Lalu pilih tab Start Clients -> Service Programming

10. Tekan ‘OK’

11. Pilih Chipset SURF6300-Blackberry pada window Select Base Model
Tekan ‘OK’
Tidak berlaku untuk QPST versi 2.7 build 301

12. Pilih Read From Phone kemudian masukkan Service Programming Code (SPC)
Tekan ‘OK’

13. Pada tab ‘CDMA’ masukkan parameter sebagai berikut:
a.Directory #: MDN tanpa angka ‘0’
b.MCC: 510 (country code)
c.11_12(MNC): 09 (network code)
d.IMSI_S: MIN (10 digit)

14. Pada tab ‘System’, kemudian isi parameter SID dengan 10608 dan NID dengan 65535.
Tekan ‘OK’

15. Set Preferred Mode, Band Preference, dan Roam Preference menjadi Automatic

16. Pilih tab ‘Roam’

17. Pilih tab ‘Browse’, arahkan direktori tempat dimana file EVDO IS683C-10009 tersimpan
Tekan ‘Open’

18. Lanjutkan ke tab ‘M.IP’ dan pada Mobile IP Behavior pilih Simple IP Only

19. Pastikan User Profile kosong (hapus user profile yang ada)

20. Lanjut ke tab ‘PPP Config’

21. Pilih sub tab ‘Um’ dan isi pada kolom
User ID: MDN@SIPsmartblackberry.com
Tethered NAI: MDN@modem.SIPsmartblackberry.com
Klik Default Values
Hilangkan tanda centang pada pilihan Req PW enc

22. Pilih sub tab ‘AN’

23. Masukkan pada kolom User ID dengan MDN@evdo.SIPsmartblackberry.com
Klik Default Values
Hilangkan tanda centang pada pilihan Req PW enc

24. Pastikan semua tab sudah terisi dengan benar, kemudian klik ‘Write to Phone’

25. Pilih ‘No’ pada notifikasi “The model of phone on COM Port has changed. Do you wish to close this connection?”

26. Tunggu sampai proses penulisan selesai

27. Pilih ‘OK’ jika muncul Pop-up “NV Write Error”
Notifikasi ini tidak muncul pada QPST versi 2.7 build 301

28. Pilih ‘OK’ pada notifikasi “Phone no longer detected”

29. Setelah proses penulisan parameter selesai, tutup aplikasi QPST dengan menekan tombol [X] lalu pilih ‘No’ ketika muncul notifikasi “Save changes to xxxxxx?”

30. setelah beres cabut BB dari PC


Aktifasi BB

1. Tekan tombol power Blackberry

2. Tunggu dan pastikan Blackberry sudah dalam kondisi menyala

3. Pilih ‘Remind Me Later’ pada pilihan Setup Wizard (klo gak muncul lanjut ajah)

4. Dial ##SPC (000000 untuk Verizon)

5. Muncul tampilan ‘CDMA Service Edit Screen’

6. Lihat pada baris Blackberry Registration Id, jika sudah 10608 tidak perlu lagi melakukan langkah dibawah ini. Selain itu, lanjutkan langkah dibawah ini.

7. Ubah Blackberry Registration Id dengan menekan tombol Menu (lambang BB)

8. Pilih Edit ‘BB Reg ID’

9. Arahkan kursor pada angka yg tertera dibawah ‘BB Reg Ids in list’

10. Tekan menu (lambang BB)

11. Pilih ‘Delete’

12. Isi Blackberry Registration Ids baru dengan ‘10608’

13. Tekan menu (lambang BB)

14. Pilih ‘Save’

15. Tekan menu (lambang BB)

16. Pilih ‘Close’

17. Scroll kebawah pada CDMA Service Edit Screen sampai pada baris A-KEY

18. Masukkan A-KEY (26 digit)

19. Tekan menu (lambang BB)

20. Pilih ‘Save’

21. Device akan restart secara otomatis

22. Tunggu hingga proses restart selesai

23 .Pilih ‘Remind Me Later’ pada pilihan Setup Wizard (klo gak muncul lanjut ajah)

24. Tekan menu (lambang BB) pilih ‘Manage Connection’

25. Beri tanda centang pada pilihan ‘Mobile Network’

26. Pastikan indikator sinyal sudah muncul yang menandakan Mobile Network sudah aktif.

27. Lakukan tes panggilan ke 881. Outgoing dan incoming untuk memastikan proses inject telah sukses

28. Cek pulsa dengan dial *999, minimal sisa pulsa Rp 10.000,- untuk dapat menikmati layanan BIS Smart


Semoga bermanfaat,Copas doang
Attached Files
BBnya seri apa & pake carrier/operator apa gan, sebelumnya sudah dicoba inject dengan apa?

Tambahan PRL Flexi + EVDO :
Attached Files Attached Files
Siapa tau masih ada yg butuh...
Attached Files Attached Files
Tutorial Inject BB CDMA ( 8130,8230,8330,8830,8530,9530,9630 )

TUTORIAL INJECT BB CDMA

Quote:
1. Siapkan kebutuhan untuk Inject CDMA

- BB nya yang pasti suport CDMA
- No Telp yang mau di Inject (Flexy, Smart, Starone atau yg lainnya)
- Minta informasi AKEY (26 digit) dan MIN (10 digit tanpa 51009) ke operator
- Kabel data ya jangan lupa
- PC yg sudah di instal DM versi yang baru dan QPST versi 2.7 build 301( kebetulan pakai yang ini)

Link Download QPST

2. Jika sudah siap semua yg di butuhkan mari kita coba inject/Update PRL :

- Jalankan Blackberry Desktop Manager, hubungkan Blackberry ke USB port, Pastikan Blackberry dalam keadaan hidup dan terhubung dengan Blackberry Desktop Manager (indikasi ‘Device Connected’ dengan PIN perangkat Blackberry), Pastikan pada device manager terdapat dua RIM virtual. (control panel>system>Hardware>device manager>ports (com&LPT) COM port dapat berbeda pada setiap komputer
- Jalankan QPST Configuration, Pilih tab Ports lalu Pilih ‘Add New Port’, kemudian pilih port sesuai dengan yg tertera pada control panel>system>Hardware>device manager>ports (com&LPT) [gunakan virtual port terbesar] Langkah ini (Add New Port) hanya dilakukan pada instalasi pertama, untuk port yang sudah pernah ditambahkan di QPST tidak perlu melakukan langkah ‘Add New Port’ ini.
- Perangkat yang terhubung akan terdeteksi secara otomatis oleh QPST, Lalu pilih tab Start Clients> Service Programming, Tekan ‘OK’
Pilih Chipset SURF6300-Blackberry pada window Select Base Model lalu Tekan ‘OK’
(berlaku untuk QPST yang versi nya dibawa 2.7 build 301)
- Pilih Read From Phone kemudian masukkan Service Programming Code (SPC) 000000 kaku Tekan ‘OK’
Pada tab ‘CDMA’ masukkan parameter sebagai berikut :
a. Directory # : Mobile Directory Number (MDN) tanpa angka ‘0’ (No Telp yg akan di Inject) contoh 6221XXXX
b. Mobile Country Code (MCC) : 510 (country code)
c. Mobile Network Code (MNC): 09 (network code untuk Smart dan 03 untuk Starone)
d. IMSI_S: 10digit terakhir dari MIN
- Pada tab ‘System’, kemudian isi parameter SID dengan 10608 dan NID dengan 65535 (untuk Smart sedangkan untuk Starone isi SID dengan 10817 dan NID dengan 65535. Lalu Tekan ‘OK’
- Set Preferred Mode, Band Preference, dan Roam Preference menjadi Automatic
- Pilih tab ‘Roam’ lalu Pilih tab ‘Browse’, arahkan direktori tempat dimana file EVDO IS683C-10009 tersimpan untuk Smart atau PRL 10001 untuk Starone dan Tekan ‘Open’
- Lanjutkan ke tab ‘M.IP’ dan pada Mobile IP behavior pilih Simple IP Only lalu Pastikan User Profile kosong.
Lanjut ke tab ‘PPP Config’ Lalu Pilih sub tab ‘Um’ dan isi pada kolom User ID: MDN@SIPsmartblackberry.com dan isi Tethered NAI: MDN@modem.SIPsmartblackberry.com lalu Klik Default Values dan Hilangkan tanda centang pada pilihan Req PW enc
Lanjukan Pilih sub tab ‘AN’kemudian Masukkan pada kolom User ID dengan MDN@evdo.SIPsmartblackberry.com lalu Klik Default Values dan Hilangkan tanda centang pada pilihan Req PW enc
- Pastikan semua tab sudah terisi dengan benar, kemudian klik ‘Write to Phone’
Pilih ‘No’ pada notifikasi “The model of phone on COM Port has changed. Do you wish to close this connection?” Tunggu sampai proses penulisan selesai
Pilih ‘OK’ jika muncul Pop-up “NV Write Error” (Notifikasi ini tidak muncul pada QPST versi 2.7 build 301)
Pilih ‘OK’ pada notifikasi “Phone no longer detected”
Setelah proses penulisan parameter selesai, tutup aplikasi QPST dengan menekan tombol [X] lalu pilih ‘No’ ketika muncul notifikasi “Save changes to xxxxxx?”
Akhiri koneksi handset PC dengan melepaskan kabel data dari PC
- Proses Inject PRL selesai

3. Saatnya untuk Inject No Telp ke BB


- Pastikan BB bisa menyalah dan tidak rusak hehehe just kidding
- Pastikan Network Mode pada perangkat di set 1XEV. Options>Mobile Network>Network Mode>1XEV
- Dial ##SPC (000000 untuk Verizon)
Muncul tampilan ‘CDMA Service Edit Screen’
Lihat pada baris Blackberry Registration Id, jika sudah 10608 (Untuk Smart sedangkan Starone 10817) tidak perlu lagi melakukan langkah dibawah ini. Selain itu, lanjutkan langkah dibawah ini.
- Ubah BB Reg Id dengan menekan tombol menu (lambang BB)
Pilih Edit ‘BB Reg ID’ lalu Arahkan kursor pada angka yg tertera dibawah ‘BB Reg Ids in list’ lalu Tekan menu (lambang BB)Pilih ‘Delete’ lalu Isi Blackberry Registration Ids baru dengan ‘10608’ untuk smart sedangkan Starone 10817 lalu Tekan menu (lambang BB) lagi dan Pilih ‘Save’Tekan menu (lambang BB) Pilih ‘Close’
- Scroll kebawah pada CDMA Service Edit Screen sampai pada baris A-KEY lalu Masukkan A-KEY (26 digit) lalu Tekan menu (lambang BB) dan Pilih ‘Save’
Device akan restart secara otomatis Tunggu hingga proses restart selesai
- Pilih ‘Manage Connection’ lalu Beri tanda centang pada pilihan ‘Mobile Network’
Pastikan indikator sinyal sudah muncul yang menandakan Mobile Network sudah aktif.
Lakukan tes panggilan Outgoing dan incoming untuk memastikan proses injek telah sukses Lakukan cek pulsa dan pastikan pulsa cukup untuk langganan BIS
- Jika semua lancar coba untuk berlangganan BIS harian dulu untuk coba coba dulu
- Klau tidak ada masalah Proses Inject Sukses, jika ada masalah jangan kawatir coba baca dari atas kembali dan ikuti prosedur yg sudah diberikan diatas
- Jika masih tetep nggak bisa, minta tolong sama Teknisi Operator....
ada lagi tutorial dr agan bijilabu di http://www.kaskus.us/showpost.php?p=...postcount=1834

Jika ada yang kurang silakan ditambahkan ya
Semoga bermanfaat.....

Senin, 17 Oktober 2011

Service Book (SB) is a record containing configurations of some BlackBerry (BB) services such as email, Browser and email’s attached file formats.

How to download Service Book into your BlackBerry phone?

There are 2 methods to download SB to your BB:

  1. First method, get it from BIS/BES. If you are using BIS/BES, you just need to call to your network admin and (s)he will send it to you.
  2. Second method: some BB services already had SB (as called “hard SB”) in your system such as email or Wifi. In this case, what you need is that you remove BB battery and insert it again. SB will install automatically into you phone.
The above information is from T-mobile. For Wifi SB, you only need to remove battery and inser it again. SB will install into your BB. For email SB, I tried to use this method but SB was not installed into the phone. Some cases, when you reinstall OS when the battery was removed from the tray, “hard SB” can be restored.
Update: The fastest way to backup/restore Service  Book on your BlackBerry (no need to remove Browser Module)

Enable Legacy SB Restore mode

Go to Options > Advanced Options > Service Book
hold ALT and press S B E B
(with 1/2 qwerty model hold ALT and press S S B E B)
(with touch screen model  hold  [!?123]  until it show lock icon and press  4  ?  2  ? -  mean ALT SBEB )
you will see the message Legacy SB Restore Enable.
After that you can free to backup/Restore Service Book on your BlackBerry.
Thank CảnhSát113@tinhte.com for this infomation.

How to Backup/Restore Service Book?

Open BDM (I am using BDM 4.6 but some older versions have the same functions)
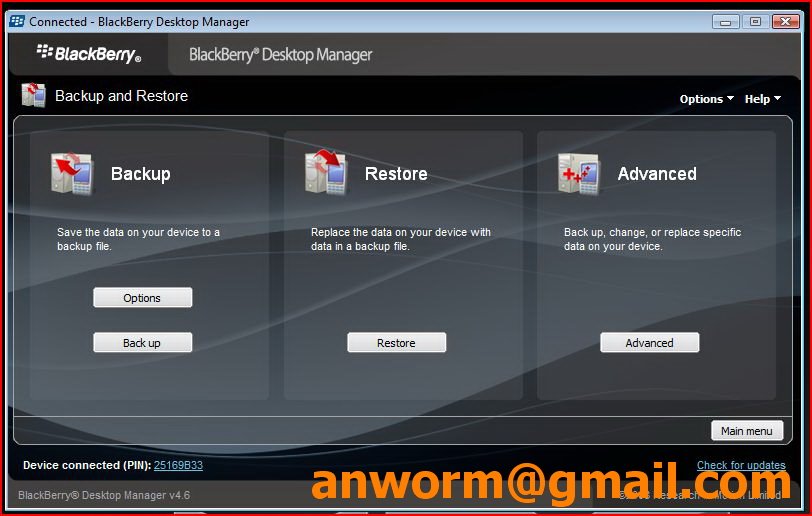
Select Backup and Restore, you will see main options, as follows:
Select Advanced
In Advanced option, you can choose Database to Backup or Restore
Select Service Book
Open backup file (.ipd) containing SB to load into BlackBerry
Then select Service Book at the left colum

Result

Before carrying out all above steps, you can see the status of your phone:
There is no BIS/BES service except gprs
After restoration of Service Book, you need to make sure Service Book is on your phone. You can check it in Options > Advanced Options > Service book. If not, follow all above steps again.
As you saw, I have 2 Service Books, one for Browser and one for Mail (I am using Funambol)
When your phone had Service Book for Browser, you need to check Service Book to make sure that it was assigned Browser in Options > Advanced Options > Browser
The picture shows that I saw Service Book was assigned Browser
You will see Browser icon displaying on the BlackBerry Desktop as well
If this icon displays, your process is successful
Next step is that you need tcp configurations in Options > Advanced Options > TCP

I am using Viettel service provider, you have to refer GPRS configurations of your service provider
Restart your phone and run Browser. Enjoy Google search!
Next, let’s try OTA download. As you saw, we don’t need BIS/BES for OTA download
Translated by: Tran Duc Chung<tranducchung@gmail.com>
check here for info about working devices
Tips
  • If you see the Browser icon, You have Service Book on your phone. But the Browser doen’t work.
    Go to Options > Advanced Options > Browser
    Click Track Wheel (or Track Ball) and Save (you dont have to change anything but just Save)
    Then back to Home and try Browser again. with some lucky it will work
  • If your BlackBerry have IT-Policy. Try to remove IT-Policy first and then Enable Browser
    Search Google “How to Remove BlackBerry IT-Policy”
  • Sometime, You can’t Enable the Browser. Just Reinstall BlackBerry OS (Upgrade or DownGrade) then Enable Browser it will Work for you.

Minggu, 16 Oktober 2011

Setelah Pembelian kirimi saya info Anda:

Pertama download tool ini:
blackberry_mep_reader-on rapidshare.com
blackberry_mep_reader-on 4shared.com
blackberry_mep_reader-on mediafire.com

blackberry MEP pembaca - di Google Docs

blackberry_mep_reader pada Dropbox

jika MEP pembaca tidak bekerja coba ini

FBI - pada 4shared.com

FBI - di rapidshare.com

FBI - di mediafire.com

FBI - di Google Docs

FBI pada Dropbox

Jalankan blackberry_mep_reader.exe yang Kemudian menghubungkan BB Anda ke PC

Klik untuk Baca Info Handset Blackberry

     Jika Anda tidak dapat menjalankan pembaca MEP pada komputer Anda

     Silahkan hubungi saya via anworm@gmail.com Gtalk atau skype anworm


Kirim IMEI dan MEP info ke saya.

Harap gunakan email yang Anda membayar melalui PayPal untuk mengirim info ke saya. (enail lainnya akan ditolak)

Saya akan mengirimkan kode untuk Anda setelah 24 jam ketika saya cek Saldo PayPal saya.

email: anworm@gmail.com

Email Subject: Blackberry Unlock Code

Nama Anda:

Model BlackBerry: 9630

BlackBerry IMEI: 355256023xxxxxx

BlackBerry Anda MEP kode: MEP-092xx-00y

Silakan kirim kode MEP dengan format MEP-XXXXX-yyy (kode tidak PIN, atau IMEI, atau sesuatu yang lain)

Jika MEP Anda tidak seperti di atas i cant mendapatkan kode unlock untuk Anda.

BlackBerry Unlock (code unlock)

Aktifkan BlackBerry dengan usb kabel dan perangkat lunak bebas. Namun beberapa model baru seperti 9700 atau 9630 ... cant dibuka oleh perangkat lunak. Dan dengan seseorang yang tidak memiliki keterampilan PC (perangkat lunak atau perangkat keras), membuka dengan pc dan kabel USB mungkin membunuh BlackBerry mereka dan membuatnya menjadi pemegang kertas.

Cara termudah untuk membuka BlackBerry Anda membeli kode unlock.

lihat Bagaimana membuka BlackBerry dengan kode.

Removing IT Policy

Membuka Blackberry.
Pertama-tama, ini bukan panduan tentang cara untuk menghapus informasi pembawa dari Blackberry. Jika Anda tidak dapat menggunakan kartu SIM yang berbeda dari yang awalnya disertakan dengan perangkat Anda, mencari tempat lain. Namun jika, seperti banyak orang lain Anda memiliki Blackberry yang terkunci oleh BES, yang berarti Anda tidak dapat mengubah pengaturan tertentu, atau menginstal Aplikasi Pihak Ketiga maka baca terus. Pada dasarnya, masalahnya adalah bahwa Blackberry Anda memiliki di beberapa titik telah terhubung ke BES (Blackberry Enterprise Server), dan ini BES telah menempatkan Kebijakan Keamanan restriktif (atau Kebijakan TI) pada perangkat Anda. Sebuah cek cepat untuk melihat apakah hal ini terjadi dapat dilakukan dengan masuk ke Options / Keamanan pada Device. Jika Anda melihat referensi untuk Kebijakan TI apapun, maka Anda memiliki Kebijakan TI berpotensi membatasi yang dapat dihapus.
Disclaimer / Intended Gunakan.
    
Panduan ini ditujukan untuk digunakan oleh orang-orang yang memiliki Blackberry mereka sendiri, dan untuk alasan apapun, telah mewarisi Kebijakan TI perusahaan pada Device mereka. Sungguh, ada dua skenario di mana panduan ini berguna.
Anda, seperti saya, membeli Blackberry di eBay dan tidak mampu untuk membuat perubahan pada pengaturan atau menginstal Aplikasi Pihak Ketiga. Anda memiliki Blackberry yang sebelumnya terhubung ke BES perusahaan dan, untuk alasan apapun, Anda tidak lagi berniat untuk membuat koneksi ke BES. Jika Anda masih terhubung ke BES Company, dan hanya ingin menginstal Aplikasi Partai terbaru dan terbesar ketiga saya tidak akan merekomendasikan pendekatan ini. Berbicara dengan administrator Anda dan meminta mereka untuk memberikan Anda hak-hak yang sesuai. Ada dua masalah dalam menggunakan panduan ini untuk memotong Kebijakan Keamanan Perusahaan Anda. Pertama, setiap kali Anda kembali ke Server Perusahaan, pengaturan keamanan Anda akan kembali ke bagaimana mereka. Kedua, dan (mungkin) lebih penting, Anda menjalankan resiko dipecat.ProsedurMetode Satu
Metode 1: Kebijakan TI Removal (Diutamakan)
Jika Anda memiliki perangkat 8xxx atau 9xxx metode terbaik untuk menghilangkan kebijakan TI adalah untuk update ke OS 4.3 atau lebih tinggi (jika mungkin) dan Anda dapat menggunakan JL_Cmder itu "resettofactory" perintah untuk menghapus SEMUA TI pembatasan kebijakan Firewall, dan pengaturan aplikasi Izin. Setelah Anda telah meng-upgrade ke OS 4.3 atau lebih tinggi, cukup cadangan perangkat menggunakan Desktop Manager, Desktop Manager dekat, kemudian jalankan JL_Cmder dan menjalankan "resettofactory" perintah. Perangkat akan melakukan penghapusan keamanan perangkat; (artinya menghapus data Anda, tetapi meninggalkan OS, JANGAN gunakan "Usap" perintah dalam JL_Cmder) kemudian reboot meninggalkan OS, aplikasi pihak ke-3 namun tidak ada data DAN, terbaik dari semua, TIDAK kebijakan TI apapun. Bila Anda selesai, cukup mengembalikan cadangan Anda dan Anda baik untuk pergi dengan tidak ada kebijakan atau firewall terkunci. Anda dapat men-downgrade kembali ke OS lama jika Anda inginkan, juga.
Ambil JL_Cmder dari link ini: http://www.blackberryforums.com/general-blackberry-discussion/18789-jl_cmder.html
Jika perangkat Anda 7xxx atau 8xxx adalah menjalankan OS 4.2 atau lebih rendah (lihat dalam Pilihan> Tentang) dan Anda tidak dapat meng-upgrade ke OS 4.3 atau lebih tinggi Anda TIDAK akan dapat menggunakan metode 1 di atas dan Anda akan perlu menggunakan metode # 2 di bawah ini:Metode DuaLangkah 1
Pastikan Desktop Manager Blackberry diinstal menggunakan Blackberry Internet Service, dan tidak Blackberry Enterprise Server. Jika Anda tidak yakin, mungkin akan menjadi ide yang baik untuk menghapus Desktop Manager dan mulai lagi.
Jika Anda tidak memiliki CD yang datang dengan Blackberry Anda, Perangkat Lunak dapat didownload di sini. Situs Software BlackBerryLangkah 2
Download Download lagu policy.bin berkas sini. dan menyimpannya dalam direktori instalasi Blackberry (C: \ Program Files \ Research In Motion \ BlackBerry).Langkah 3
Usap Blackberry Anda, menciptakan cadangan jika diperlukan. Pilih Pilihan / Keamanan / Lap (Baru 4,2 OS Perangkat Goto Pilihan / Security Options / General Settings / Lap) pada Device.
Jika opsi ini tidak tersedia, Anda mungkin harus menginstal perangkat lunak terbaru di Blackberry Anda. Anda perlu menginstal Download dan Desktop Software terbaru Manger, maka Perangkat Lunak Genggam terbaru. Hubungkan perangkat Anda, buka Desktop Manager, pilih Application Loader, dan ikuti petunjuknya.Langkah 4
Tutup Desktop Manager jika terbuka.Langkah 5
Dari Menu Start Windows pilih Run ..., dan pada prompt ketik regedit. Di pohon di sisi kiri, navigasikan ke:
HKEY_Current_Users \ Software \ Research In Motion \ BlackBerry \ PolicyManager
Klik kanan Folder Policy Manager dan pilih New Value / String. Nama Jalan nilai. Sekarang, Double-klik subkunci Jalan dan set Value Data ke:
C: \ Program Files \ Research In Motion \ BlackBerry \ policy.binLangkah 6
Buka Desktop Manager.Langkah 7
Hubungkan Device.Verifikasi
Setelah selesai, Options / layar Keamanan di Blackberry Anda tidak harus berisi referensi ke sebuah Kebijakan TI, Anda sekarang harus dapat mengubah semua pengaturan (termasuk password prompt), dan menginstal Aplikasi Pihak Ketiga.
Guys,

pasti ada yg punya BB CDMA khan ?

saat ini dah bisa di inject flexy, smart


kenapa BB CDMA ?

padahal belom ada BIS ? (mungkin segera)

1. Internet / data plan cdma itu murah meriah. jadi dengan 45rebu / bln bisa dapet full internet access untuk BBnya.
2. Push Mail masih bisa via Gmail, dan ada program aplikasi astrasync buat narik exchange server.


so, yuk bahas di ini, pada pake apa aja yg BB CDMA.


gw pake 8130 (baru pake 2 hari)
karena service booknya ga ada email dan browser gw pake http://bb.anworm.com/Home/english
[beep] nya sehingga bisa install aplikasi .alx


mohon suhu2 kalo ada tips n trick bagi2 yaaa....just share

Sabtu, 15 Oktober 2011

NOKIA DCT3

Model
Type
Version
Download
2100
nam-2
5.84
3210
nse-8
6.00
3310 - 3315
nhm-5
6.39
3330
nhm-6
4.50
3410
nhm-2
5.46
5110
nse-1
5.30
5210
nsm-5
5.40
5510
npm-5
3.53
6110
nse-3
5.48
6150
nsm-1
5.23
6210
npe-3
5.56
6250
nhm-3
5.03
7110
nse-5
5.01
8210
nsm-3
5.31
8810
nse-6
6.02
8850
nsm-2
5.31
  
NOKIA PM
1100.pm 2650.pm 6070.pm 7200.pm
1100_Main.pm 3100 S.pm 6100.pm 7210.pm
1100-RH18.pm 3108.pm 6101_FULL_PM 7250.pm
1100-RH36.pm 3120.pm 6101.pm 7250I.PM
1100-RH38.pm 3200.pm 6103_PM 7260.pm
1101.pm 3200b.pm 6108.PM 7280.pm
1110.pm 3220.pm 6111.pm 7360.pm
1110i.pm 3300.PM 6200.pm 7360_FULL.pm
1112 No IMEI.pm 3320.pm 6220.pm 7600.pm
1112.pm 3360_3320 .pm 6230.pm 7600_ful_PM
1200.pm 3510.pm 6230_bluetooth.pm 7610.pm
1208_FULL_PM 3510i.pm 6230_full_pm 7610-BlutoothFix
1208_PM 3510i_pm_KEYPAD 6230i.pm 7650.pm
1220.pm 3520.pm 6260.pm 7710_PM
1221.pm 3595.pm 6310.pm 8310.pm
1600.pm 3650.pm 6310i.pm 8800_PM
1600_FULL_PM 3650_Nhl-8_Main.pm 6320i_PM 8910.pm
1650.pm 3660.pm 6510.PM 8910i.pm
1650-full.pm 5100.pm 6560.pm 9500.pm
2220.pm 5140.pm 6600.pm n70.pm
2300 RM4.pm 5140i.pm 6600_Nhl-10_Main.pm 2600c_Full.pm
2300 RM5.pm 6020_FULL_PM 6610.pm N-Gage QD.pm
2300.pm 6020.pm 6610i.pm N-GAGE.pm
2300_rm4_full.pm 6030 No IMEI.pm 6630_PM N-GAGE_Nem-4pm
2310_PM 6030_Full_PM 6650.pm  
2600.pm 6030.PM 6670.pm  
2600_RH59_full.pm 6030b_Full.pm 6680_PM  
2626_PM 6030b_Signal.pm 6800.PM  
2630 PM 6060.pm 6820.pm  
   
ERASE FLASH
3650_erase 6600_erase 7650_erase N-Gage Full Erase
7250i_fullerase NEM4_ERASE32mb NHM_7_EERASE RH_18_1100_EErease
nhl2_eerase nhl2_eeraseFULL nmp9_eerase  
BB5Erase_8MBrap BB5Erase_16MBrap BB5Erase_32MBrap  

Rabu, 12 Oktober 2011

The following table lists errors that can occur in the Java virtual machine (JVM) on BlackBerry handhelds.

101 Previous startup failed The device has been reset during the JVM boot process. This error indicates that the JVM found the "boot in progress" flag was set on startup. The screen is intended to break continuous reset loops so that corrective action can be taken.

102 Invalid code in filesystem The system has checked the .COD files in the handheld for modification, and determined that there is a problem with one or more .COD files. If all loads fail, it could indicate a build process error where there was a problem signing the codfiles. If some user action to the device caused this problem, the reset cycle will be continuous since the code in the filesystem has been corrupted. The only recovery method is to wipe the device and restore a new system.

103 Cannot find starting address The starting address for the boot .COD file cannot be found. This may indicate that a boot .COD file has not been installed on the device, or that its format is invalid or corrupt.

104 Uncaught: <Java-type-name> An uncaught Java exception was thrown by the Java code and diagnosed by the JVM. Execution can be continued, or the handheld can be attached to a debugger on a desktop through a serial or USB cable. The event log should contain the traceback of the thrown exception.

105 Example, DbRecSize( %d ) -> %d The file system API has returned an error status for a certain operation. This could indicate a corrupt filesystem or an error in the JVM.

106 Graphics system error An error has been detected in the graphics system of the device.

107 operator new() called A C++ class in the JVM has not been coded correctly to inherit from VMRamObject that has the correct override for operator new. Extract the current (post-reset) BUGDISP

108 operator delete() called A C++ class in the JVM has not been coded correctly to inherit from VMRamObject that has the correct override for operator delete. Extract the current (post-reset) BUGDISP.

109 PriorityMessageCount error: <priority-count> The value returned by RimPriorityMessageCount is negative when it should always be greater than or equal to zero. This indicates an error in the OS code. Extract the current (post-reset) BUGDISP and EVENTLOG.

110 Non-idle event downtime error: <down-time> <idle-down-time> A problem has been detected in the accumulation of JVM down time, which represents how long the JVM has been idle. This usually indicates an error in the handheld firmware or the JVM. This could also occur if the tick count rolls over after 400+ days of device time.

111 Font engine error An error has been detected in the font engine system of the device. Extract the current (post-reset) BUGDISP and EVENTLOG.

112 Java Native Assertion Failure An error has been detected in the Java native code. Extract the current (post-reset) BUGDISP and EVENTLOG.

200 Application manager threw an uncaught exception The application manager event thread threw an uncaught exception and so cannot continue execution.

201 Crypto initialization code failed The initialization of the crypto system failed and the handheld cannot continue execution.

202 An attack on the key store has been detected The attack has been detected and execution cannot continue.

203 Console process died The application manager console process (usually the Ribbon) has died. This is likely due to an uncaught exception during execution.

204 Persistent Content Exception An application tried to commit a plaintext object to the Persistent Store. This will only happen if Content Protection is on and a process tries to save something in the PersistentStore that is marked as plaintext. Since this exception was not handled, the persistent store is in a bad state. We need to reset to roll back to the last good commit point. NOTE: This JVM error reflects an error in the Java code, the JVM is simply diagnosing the error. This is not a JVM problem, the eventlog will contain information about the erroneous Java code.

501 VM_THREAD_SWITCHED: Internal Error This is an error return used internally in the VM. It should never be reported as a device error.

502 VM_PROCESS_DEATH: All processes exited The last Java process has terminated. There is nothing left to execute.

503 VM_THREAD_DEATH: Internal Error This is an error return used internally in the VM. It should never be reported as a device error.

504 VM_THREAD_SWITCH: Internal Error This is an error return used internally in the VM. It should never be reported as a device error.

505 VM_BAD_CODE: Bad Byte Code An error has occurred in the JIT compiler.

506 Uncaught Exception An uncaught Java exception was thrown in the initial VM Java thread thus ending the only live thread in the system. The eventlog contains the traceback for the exception.

507 Unsatisfied Link A dependency on a .COD file could not be satisfied because the .COD file is missing.

508 Invalid object A problem has been detected with a debugger command to the VM.

509 VM_PPO_INFINITE_LOOP: infinite loop in PPO phase of GC The maximum iteration count for the PPO phase of a GC must be the maximum number of file handles in the system. This error indicates that the iteration count has exceeded that count and hence there is a flaw in the PPO loop or a corrupted file system. The extra hex integer in the error string is the flash id of the current record where the infinite loop was detected.

510 Deadlock All threads are waiting on objects, resulting in deadlock. The system cannot recover from this state because no thread can release a lock.

511 Debug connection died A problem has occurred while debugging that may be caused by a VM problem or an incorrect debugging command being sent to the VM.

512 GC Aborted An idle garbage collection has been interrupted by a user event, such as pressing the keyboard or moving the trackwheel.

513 <clinit> needs running An opcode requires that a class <clinit> execute before it can continue execution.

514 <init> needs running A new instance of a class has been allocated and it must be initialized by the default constructor before it can be used.

515 Object group too big The reachable objects form a group that cannot be represented properly by the JVM because either there are too many objects or the total size of the objects is too large.

516 Persistent ids exhausted When committing a persistent object, the JVM found that the persistent store id counter has reached its limit. The object was not committed and a critical error was reported. This error should never happen unless a device is heavily used for years.

517 Filesystem corrupt An inconsistency has been detected in the JVM persistent object store.

518 Unexpected longjmp A garbage collection marking phase was terminated via a longjmp. This indicates that the marking phase was interrupted when it should have completed without interruption. This should never happen because these actions are executed when the device is not idle, and GCs can only be interrupted when the device is idle.

519 Internal Error The JVM host is missing or has been disabled.

520 Internal Return An internal state that indicates a Java method return needs to be executed.

521 Dangerous Wait An Object.wait() has been executed by a thread that holds a lock on another object. This is only checked in the simulator under the control of the JvmDebugWaits application switch.

522 Interlaced synchronization A thread has acquired two locks on objects in an order that doesn't match the order that previous locks for the two types were acquired. This indicates a future potential deadlock situation and is reported. The check is only available in the simulator under the control of the JvmDebugLocks application switch.

523 System process died A critical Java process has terminated, and the device cannot continue to operate in a normal manner.

524 LMM error An object has been marked as recovered by the Low Memory Manager, but it was not freed during a garbage collection. This is only checked in the simulator under the control of the JvmDebugLMM application switch.

525 Bad persistent object An auto-commit operation during a garbage collection has detected a non-persistent object reachable from the persistent store root. The type of the object has been output into the eventlog.

526 java.lang.Object not found The class definition for java.lang.Object cannot be found.

527 java.lang.String not found The class definition for java.lang.String cannot be found.

528 Corrupt filesystem. Unrecoverable. All data will be lost

All data will be lost when execution is continued. The error message screen contains a number representing an internal "reason" for the corruption. This error is not diagnosed if a .COD file has been removed, because the JVM must delete objects that were defined in the removed .COD file; therefore, this error is not expected in normal operation of the device.

Reason codes:

1. root array reference is not a valid array reference
2. root array type is not Object[]
3. root array size < 1 (i.e., Object[0])
4. contents of root[0] is not a valid ref
5. type of root[0] is not a LongIntHashtable
6. persistent segmented array header contains an invalid reference
7. an entry in a persistent Object[] contains an invalid reference
8. an Object's type refers to an unknown codfile
9. an Object's type description in the codfile doesn't match the size in the store
10. a reference type field in an Object has an invalid reference in it
11. a reference type field in an object points to an object of the wrong type
12. a persistent Object[] is missing its descriptor
13. object in persistent store is not marked as persistable
14. root array is segmented and one of the segments is invalid

529 Corrupt filesystem. About to attempt recovery. Some data may be lost

Some data will be lost when execution is continued. The error message screen contains a number representing an internal "reason" for the corruption. This error is not diagnosed if a .COD file has been removed, because the VM must delete objects that were defined in the removed .COD file; therefore, this error is not expected in normal operation of the device.

Reason codes:

1. root array reference is not a valid array reference
2. root array type is not Object[]
3. root array size < 1 (i.e., Object[0])
4. contents of root[0] is not a valid ref
5. type of root[0] is not a LongIntHashtable
6. persistent segmented array header contains an invalid reference
7. an entry in a persistent Object[] contains an invalid reference
8. an Object's type refers to an unknown codfile
9. an Object's type description in the codfile doesn't match the size in the store
10. a reference type field in an Object has an invalid reference in it
11. a reference type field in an object points to an object of the wrong type
12. a persistent Object[] is missing its descriptor
13. object in persistent store is not marked as persistable
14. root array is segmented and one of the segments is invalid

530 VM_PREVENT_GC_OVERFLOW: _preventGC overflow A fixed number of native objects can be protected from being garbage collected. This error indicates that a native has exceeded the fixed limit of objects that can be protected. If the device is reset or thread tracebacks are logged, the name of the actual native can be extracted.

531 Flash exhausted There are certain operations where the JVM cannot tolerate running out of flash space. In these circumstances, this error will be reported if the JVM cannot allocate a required amount of flash space.

532 VM_ASSERTION_FAILED: Assertion failed Normally this JVM error should never be reported since the device is not shipped with assertions enabled. The simulator may report this error in debug mode indicating a VM assertion has been violated. Try typing BKPT to activate the debugger and dump the native call stack for forwarding to the VM team.

533 VM_RUN_METHOD: <method> needs running Used internally for ECMAScript to call Java methods.

534 VM_FAST_RESET_DISABLED: Fast Reset Disabled Used internally to indicate that fast reset capability is not available. Often used in platform-specific code.

535 VM_UNUSED_535: Unused Unused vm error.
Error 535 means out of memory. A reason for error 535 could be that the virtual memory thread scheduler ceased when a thread ran out of memory. This error is known to occur during a start-up sequence or if the main event thread ceases.

Resolution
First, hard reset the handheld. If this does not resolve the issue, obtain the latest version of the BlackBerry handheld software through your carrier. Then, run Application Loader from BlackBerry Desktop Manager to update the handheld.

Delete some themes/ringtones etc to make space.

536 VM_FAST_RESET_BAD_INSTANCE: VM Instance Check Failed Used internally to indicate that the VM structure passed in is at the wrong address or has been corrupted.

537 VM_FAST_RESET_BAD_HEAP: Heap Check Failed Used internally to indicate that the VM heap has been corrupted or pointers into the heap have been corrupted.

538 VM_FAST_RESET_BAD_IRAM: IRAM Check Failed Used internally to indicate that the VM IRAM checks have detected corruption of VM data structures (threads + local stacks) that reside in IRAM.

539 VM_FAST_RESET_NOT_IDLE: Not Idle Used internally to indicate that the VM was not idle when the reset occurred and, as such, cannot continue with a fast reset.

540 VM_FAST_RESET_MULTIPLE_RESETS: Multiple Resets Used internally to indicate that the time since the last fast reset is less than a minimum time. By disallowing multiple fast resets in a short amount of time, this should prevent fast reset loops.

541 VM_HEAP_COMPACT_INFINITE_LOOP: infinite loop detected in heap compaction The VM has detected a problem in its RAM heap that indicates its RAM has been corrupted. The problem was detected by identifying a possible infinite loop during RAM heap compaction. A bugdisp log and eventlog should be extracted quickly when the device is in this condition. If possible, images of RAM should be saved.

542 Transient memory leak The JVM has detected that some memory has not been freed, which indicates that a memory leak has occurred. This condition is detected as early as possible in the hope that the cause can be isolated.

543 VM_FS_MISMATCH: Incompatible Java filesystem installed The VM has detected that the OS binary is different than the OS binary used to create the Java file system. This means that the Java native methods may not be linked properly and as such, the integrity of the system cannot be guaranteed. The system can be recovered by using the VM DLFX and DLPS commands to delete the fixups and persistent store. This will clear all data and fixups and let the filesystem relink to match the new OS binary. The recovery order is important: 1) Delete Fixups 2) Delete Persistent Store 3) Reset device.

544 VM_SECTION_MAP_OVERFLOW: a module references more than 255 other modules The VM has detected that a module is trying to reference more than 255 other modules. The filesystem should be extracted immediately when this error is detected.

545 VM_INCOMPATIBLE_FILESYS: an incompatible or corrupt filesystem was found The VM has detected an incompatible or corrupt filesystem. The filesystem should be extracted immediately when this error is detected.

546 VM_UNUSED_546: unused The VM has detected that the RAM image of its filesystem is corrupted (failed CRC check) Better to reset than to duplice the corruption into flash.

547 VM_UNUSED_547: unused Unused vm error.

548 VM_UNUSED_548: unused Unused vm error.

549 VM_UNUSED_549: unused Unused vm error.